After saerching the web for a tool for Ubuntu to test DNS servers, I have found Namebench. This tool allows via a graphical user interface to perform tests that will help you decide which DNS servers work best and fast for our Internet connection.
Namebench is a cross-platform application that can be run under Mac OS X, Windows and GNU/Linux. In this tutorial, we will show you how to install Namebench on Ubuntu.
Get Started
1. Install first this dependency to be able to use a GUI for Namebench:
sudo apt-get install python-tk
2. Using the Terminal, run these commands to install Namebench (v1.3.1) on Ubuntu:
wget http://namebench.googlecode.com/files/namebench-1.3.1-source.tgz
tar -zxvf namebench-1.3.1-source.tgz
cd namebench-1.3.1
sudo python setup.py install
3. To start the application, run this command:
./namebench.py
----------------------
[Update - 10/30/2011]
Namebench is now added to the official repository of Ubuntu, you can now install it with this command:
sudo apt-get install namebench
Then start it with this command:
namebench
----------------------
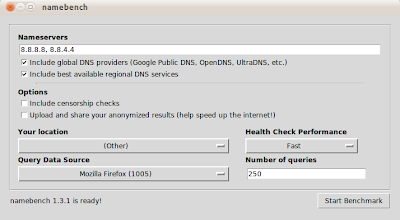
4. In the window that pops up, submit name servers separated by a comma, then click Start Benchmark to start your test.
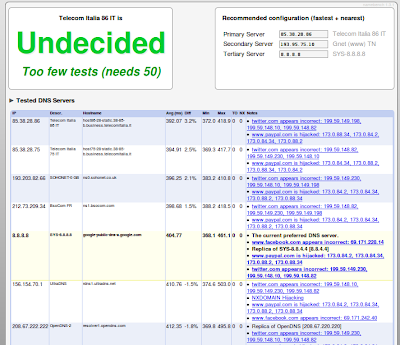
Wait for a few minutes until the test is finished in order to view results. The result page will open in Firefox: