 A VPN network (Virtual Private Network) allows to send data between two computers either across a public or shared network, which is a perfect solution for establishing long-distance or secured network connections. In this tutorial we will see how to easily create a VPN network under a system running Ubuntu 11.10/11.04.
Getting Started
1. First you need to install the pptpd server (PPTP VPN server), which is supported by Microsoft and some other network vendors. Open the terminal and run this command:
sudo apt-get install pptpd
2. Now edit the /etc/pptpd.conf file with this command:
sudo gedit /etc/pptpd.conf
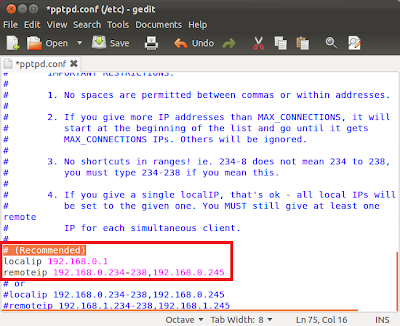
3. At the bottom of the file, you will find recommended settings for both localip and remoteip. Uncomment localip andremoteip, then configure your IP address range for remoteip if needed.
localip is the IP address of your server adapter
remoteip contains the IP address range allowed for users to use when connecting through VPN to your server.

When you finish your configuration, save the file and close it.
4. Now we must set up some users we want to grant access to the VPN server. Via the terminal run this command to edit the /etc/ppp/chap-secrets file:
sudo gedit /etc/ppp/chap-secrets
5. Add now users you want to grant access to your VPN server using these examples:
# Secrets for authentication using CHAP
# client server secret IP addresses
steve pptpd password 211.30.0.0/14
richard pptpd password 212.220.0.0/12
Note: "password" is the password that the user will use to connect to the VPN network.
To allow all IP addresses for a user, use this example:
# Secrets for authentication using CHAP
# client server secret IP addresses
steve pptpd password *
6. Finally, after each modification, you have to restart the pptpd using this command:
sudo /etc/init.d/pptpd restart
That's it!